Khamis, 10 Mac 2011

change extension file in windows

In this post i will show u how to enable extension file name, and change the extension files as well.

first, open my documents and go to tools, folder options.


then go to tab view and untick "Hide extension for known file types" and apply.


it is useful when u want to email someone with extension like .exe, .dll because email will detect it as a virus. with this changes, it can bypass email security.

example:

in my case i need file JInitiator from my friend and email it to me. the file is jvm.dll and easily change it to jvm.txt after i download it, i change back to jvm.dll. not a big problem.

bacteria comment: only download and open with file u already know whos your sender is. :D

Rabu, 19 Januari 2011

Facebook chat emoticon

Use this code to ganerate emoticon on ur facebook chat


bacteria comment: cool!

Selasa, 14 September 2010

how to view facebook by bypassing your proxy

many big company keep blocking site for their security and safety reason. this include your social networking web. u can try this alternative simple way,

just type "s" on "https://www.facebook.com" and browse. and each page u must make sure "https:" is include, or else your content will be block by your proxy.


https stands for secure connection and proxy does not block such secured connections. This is probably the simplest way to get around the proxy program as it takes little time and no one will wonder what you are up to.


bacteria comment: i only have FB account. i didnt try other. u can help me. if you success, you already a hackers now! :P

Isnin, 3 Mei 2010

Tools of the Month

1. i-reset

Use it when u cannot change the attribute setting on your file properties. This tool will reset to default setting.


What does this tool do?
Some malware do change your files' attributes to system/hidden but when you want to change them back to normal you wont be able to do that because the options are grayed.


iReset resets your system/hidden files/folders so you can view/access them normally.

How to use it?
Simply drag & drop your files/folders into the cross sign and then click RESET.

To download this tool, click link here.

2. McAfee AVERT Stinger

This tool will help you to find and eliminate specific virus and malware.


McAfee AVERT Stinger is not a substitute for the full anti-virus protection, but rather a tool that assists administrators and users when dealing with an infected system.

Stinger utilizes next generation scan engine technology, including process scanning, digitally signed DAT files, and scan performance optimizations.

This version of Stinger includes detection for all known variants :

■ BackDoor-ALI
■ BackDoor-AQJ
■ BackDoor-AQJ.b
■ BackDoor-CEB
■ BackDoor-CEB!bat
■ BackDoor-CEB!hosts
■ BackDoor-CEB.b
■ BackDoor-CEB.c
■ BackDoor-CEB.d
■ BackDoor-CEB.dll
■ BackDoor-CEB.dr
■ BackDoor-CEB.e
■ BackDoor-CEB.f
■ BackDoor-CEB.sys
■ BackDoor-CFB
■ BackDoor-JZ
■ BackDoor-JZ.dam
■ BackDoor-JZ.dr
■ BackDoor-JZ.gen
■ BackDoor-JZ.gen.b
■ Bat/Mumu.worm
■ Downloader-DN.a
■ Downloader-DN.b
■ Exploit-DcomRpc
■ Exploit-DcomRpc.b
■ Exploit-DcomRpc.dll
■ Exploit-Lsass
■ Exploit-Lsass.dll
■ Exploit-MS04-011
■ Exploit-MS04-011.gen
■ HideWindow
■ HideWindow.dll
■ IPCScan
■ IRC/Flood.ap
■ IRC/Flood.ap.bat
■ IRC/Flood.ap.dr
■ IRC/Flood.bi
■ IRC/Flood.bi.dr
■ IRC/Flood.cd
■ NTServiceLoader
■ ProcKill
■ PWS-Narod
■ PWS-Narod.dll
■ PWS-Narod.gen
■ PWS-Sincom
■ PWS-Sincom.dll
■ PWS-Sincom.dr
■ W32/Anig.worm
■ W32/Anig.worm.dll
■ W32/Bagle
■ W32/Bagle!eml.gen
■ W32/Bagle!pwdzip
■ W32/Bagle.ad!src
■ W32/Bagle.dldr
■ W32/Bagle.dll.dr
■ W32/Bagle.eml
■ W32/Bagle.fb!pwdzip
■ W32/Bagle.fc!pwdzip
■ W32/Bagle.fd!pwdzip
■ W32/Bagle.fe!pwdzip
■ W32/Bagle.fm.dldr
■ W32/Bagle.gen
■ W32/Bagle@MM!cpl
■ W32/Blaster.worm
■ W32/Blaster.worm.k
■ W32/Bropia.worm
■ W32/Bugbear
■ W32/Bugbear.a.dam
■ W32/Bugbear.b!data
■ W32/Bugbear.b.dam
■ W32/Bugbear.gen@MM
■ W32/Bugbear.h@MM
■ W32/Bugbear@MM
■ W32/Deborm.worm.ah
■ W32/Deborm.worm.gen
■ W32/Doomjuice.worm
■ W32/Dumaru
■ W32/Dumaru.ad@MM
■ W32/Dumaru.al.dll
■ W32/Dumaru.dll
■ W32/Dumaru.eml
■ W32/Dumaru.gen
■ W32/Dumaru.gen@MM
■ W32/Dumaru.w.gen
■ W32/Elkern.cav
■ W32/Elkern.cav.c
■ W32/Elkern.cav.c.dam
■ W32/Fizzer
■ W32/Fizzer.dll
■ W32/FunLove
■ W32/FunLove.apd
■ W32/Gaobot.worm
■ W32/Harwig.worm
■ W32/IRCbot
■ W32/IRCbot.worm
■ W32/IRCbot.worm.dll
■ W32/Klez
■ W32/Klez.dam
■ W32/Klez.eml
■ W32/Klez.gen.b@MM
■ W32/Klez.rar
■ W32/Korgo.worm
■ W32/Lirva
■ W32/Lirva.c.htm
■ W32/Lirva.eml
■ W32/Lirva.gen@MM
■ W32/Lirva.htm
■ W32/Lirva.txt
■ W32/Lovgate
■ W32/Mimail
■ W32/Mimail.c@MM
■ W32/Mimail.c@MM
■ W32/Mimail.i!data
■ W32/Mimail.q@MM
■ W32/MoFei.worm
■ W32/MoFei.worm.dr
■ W32/Mumu.b.worm
■ W32/Mydoom
■ W32/Mydoom!bat
■ W32/Mydoom!ftp
■ W32/Mydoom.b!hosts
■ W32/Mydoom.dam
■ W32/Mydoom.t.dll
■ W32/Mytob
■ W32/Mytob.gen@MM
■ W32/Mytob.worm
■ W32/MyWife
■ W32/MyWife.dll
■ W32/MyWife@MM
■ W32/Nachi!tftpd
■ W32/Nachi.worm
■ W32/Netsky
■ W32/Netsky.af@MM
■ W32/Nimda
■ W32/Nimda.dam
■ W32/Nimda.eml
■ W32/Nimda.gen@MM
■ W32/Nimda.htm
■ W32/Pate
■ W32/Pate!dam
■ W32/Pate.dam
■ W32/Pate.dr
■ W32/Polip
■ W32/Polip!mem
■ W32/Polybot
■ W32/Polybot.bat
■ W32/Sasser.worm
■ W32/Sasser.worm!ftp
■ W32/Sdbot
■ W32/Sdbot!irc
■ W32/Sdbot.bat
■ W32/Sdbot.cli
■ W32/Sdbot.dll
■ W32/Sdbot.dr
■ W32/Sdbot.worm
■ W32/Sdbot.worm!ftp
■ W32/Sdbot.worm.bat.b
■ W32/Sdbot.worm.dr
■ W32/Sdbot.worm.gen
■ W32/Sdbot.worm.gen.a
■ W32/Sdbot.worm.gen.b
■ W32/Sdbot.worm.gen.c
■ W32/Sdbot.worm.gen.d
■ W32/Sdbot.worm.gen.e
■ W32/Sdbot.worm.gen.q
■ W32/Sober
■ W32/Sober!data
■ W32/Sober.dam
■ W32/Sober.eml
■ W32/Sober.f.dam
■ W32/Sober.g.dam
■ W32/Sober.q!spam
■ W32/Sober.r.dr
■ W32/Sober.r@MM
■ W32/Sobig
■ W32/Sobig.dam
■ W32/Sobig.eml
■ W32/Sobig.f.dam
■ W32/Sobig.gen@MM
■ W32/Spybot.worm
■ W32/SQLSlammer.worm
■ W32/Swen
■ W32/Swen@MM
■ W32/Yaha.eml
■ W32/Yaha.gen@MM
■ W32/Yaha.y@MM
■ W32/Yaha@MM
■ W32/Zafi
■ W32/Zafi.b.dam
■ W32/Zindos.worm
■ W32/Zotob.worm
■ W32/Zotob.worm!hosts

To download this tool, click here.

bacteria comment: I use both tool to remove W32.IRCBot virus that hides my client .doc file.

Khamis, 1 April 2010

Win 7: disable unwanted services

There is many way to improve your win 7 boot time loading which one of it is to disable services.

In Windows 7 there are many unwanted services. Many of these services are not meant for a normal home PC user. You can disable these settings, as per your requirements.

1. Application Experience
2. Computer Browser
3. Error Reporting Service
4. Desktop Window Manager Session Manager
5. Diagnostic Policy Service
6. IP Helper
7. Offline Files
8. Portable Device Enumerator Service
9. Print Spooler
10. Distributed Link Tracking Client
11. Protected Storage
12. Secondary Logon
13. Server (If your computer do not connect with any network)
14. Tablet PC Input Service
15. Themes
16. TCP/IP NetBIOS Helper
17. Windows Media Center Service Launcher
18. Windows Search
19. Remote Registry
20. Windows Time
21. Windows security center
22. Windows updates
23. Windows firewall(Provided you have a security software installed)

simply click the logo icon and type services.msc in search field to open services box.

To download this tool, click here.

bacteria comment: decrease boot time. atleast.. ;D

Khamis, 4 Mac 2010

A temporary profile is loaded after logon to a Windows

To resolve this problem, follow these steps:

STEP 1 : REMOVE SID.BAK

1.Log on to the system by using an administrative user account other than the user account that is experiencing the problem.

2.Click Start, type regedit in the Start Search box, and then press ENTER.

3. Locate the following registry subkey:

HKEY_LOCAL_MACHINE\SOFTWARE\Microsoft\Windows NT\CurrentVersion\ProfileList

Under the ProfileList subkey, delete the subkey that is named SID.bak.


4.Exit Registry Editor.

5.Log off the system.

6.Log on to the system again.

7.After you log on to the system, the profile folder is re-created.


STEP 2 : RESTORE YOUR OLD PROFILE

please note that new profile will be create after you remove the SID.bak file in registry. to restore your old profile without copy paste it to new folder, follow this step. let give example that your old profile folder name is PROFILE and your new one is PROFILE.PCNAME


1.open regedit and locate subkey;

HKEY_LOCAL_MACHINE\SOFTWARE\Microsoft\Windows NT\CurrentVersion\ProfileList

2.under REG_EXPAND_SZ type, find ProfileImagePath name. search the data value contain %\Document and Setting\PROFILE.PCNAME (WIN XP) OR %\User\PROFILE.PCNAME (WIN VISTA AND 7)


3.change the data value that point to your old profile, %\Document and Setting\PROFILE (WIN XP) OR %\User\PROFILE (WIN VISTA AND 7)


4.restart your machine and done!


bacteria comment: make sure you point to right profile folder.

cd drive not accessible incorrect function

have you experience this?


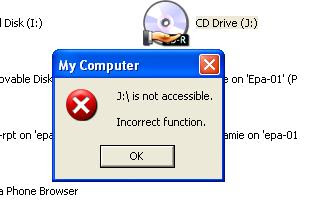
it happen to me then. so how you gone to do? did the cd drive faulty or you need to reformat windows? im sure it gonna waste ur money and time.

i try to search on net to find the solution. and there are many method to use. i will show it here, and what i want to say is, dont give up! ;D


METHOD 1 : REGISTRY

1.Click Start, and then click Run.

2.In the Open box, type regedit, and then click OK.

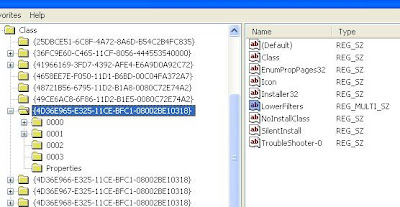
3.Locate and then click the following registry subkey: HKEY_LOCAL_MACHINE/System/CurrentControlSet/Control/Class/{4d36e965-e325-11ce bfc1-08002be10318}

4.On the File menu, click Export.

5.In the File name box, type savedkey, and then click Save.

6.Click the REG_MULTI_SZ data type UpperFilters, and then click Delete on the Edit menu. When you are prompted to confirm the deletion, click Yes.


Note: If this data type is missing, go to Method 2.

7.Click the REG_MULTI_SZ data type LowerFilters, and then click Delete on the Edit menu. When you are prompted to confirm the deletion, click Yes.

8.Quit Registry Editor, and then restart the computer.


METHOD 2 : DRIVER

1.Click Start, and then click Control Panel.

2.If Control Panel is in Category view, click Performance and Maintenance, and then click System.

If Control Panel is in Classic view, double-click System.

3.On the Hardware tab, click Device Manager.

4.On the Action menu, click Uninstall on dvd\cdrom drive. When you are prompted to confirm the removal, click OK.


5.On the Action Menu, click Scan for hardware changes.

6.Close all windows and reboot the computer.


METHOD 3 : SERVICES

1.Go to run and type services.msc

2.find and doule click on IMAPI CD-Burning COM service

3.select startup type automatic and click start on services status.


METHOD 4 : CD PROPERTIES

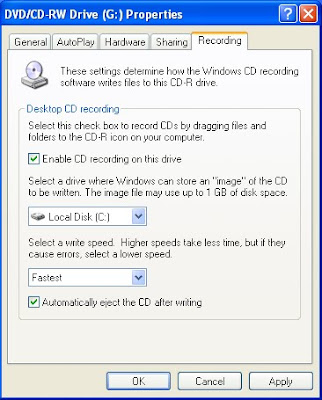
1.go to my computer and select cd drive. right click and go properties

2.go to recording tab and then check the "Enable CD Recording On This Drive" box.


3.if there is no recording tab option, u can copy this sript;

4.Create a text file with NOTEPAD containing the following data exactly as below and name it FIXCD.REG

5.Double click on the file and say yes to the merge into registry question

-------------- Use text after this line, contents of FIXCD.REG --------------

REGEDIT4

[HKEY_LOCAL_MACHINE\SYSTEM\CurrentControlSet\Control\Class\{4D36E965-E325-11CE-BFC1-08002BE10318}]
"UpperFilters"=-
"LowerFilters"=-

[-HKEY_LOCAL_MACHINE\SYSTEM\CurrentControlSet\Services\Cdr4_2K]

[-HKEY_LOCAL_MACHINE\SYSTEM\CurrentControlSet\Services\Cdralw2k]

[-HKEY_LOCAL_MACHINE\SYSTEM\CurrentControlSet\Services\Cdudf]

[-HKEY_LOCAL_MACHINE\SYSTEM\CurrentControlSet\Services\UdfReadr]

-------------- Use text before this line --------------


METHOD 5 : REINSTALL BURNING SOFTWARE

1.un-install and re-install your burning software e.g: ROXIO CREATOR, NERO.

2.try to update software and restart your machine.


bacteria comment: i use all this solution and finally i found only on the last method that bring my CDR alive! as i said, never give up. ;D

Sabtu, 6 Februari 2010

How to fix 6TO4 adapter driver

do you get issue like picture below?


A yellow exclamation mark is found at the Microsoft ISATAP 6TO4 adapter.

Sometimes we lose the internet connection because of an error in Device Manager, a yellow exclamation point is found on "Microsoft ISATAP" and on "6TO4 adapter".

According to Microsoft support, we can ignore this problem, the card will work properly. But the problem, is that in most cases, we lose our internet connection.

so what is Microsoft ISATAP?

According to the Microsoft site:
Microsoft ISATAP device (inter automatic tunneling protocol address of the site) is used to help companies transition to an IPv6 infrastructure. ISATAP encapsulates IPv6 packets using IPv4 header. This feature allows the customer carry IPv6 traffic over an IPv4 infrastructure. This approach enables organizations slowly migrate to an IPv6 infrastructure without having to spend much time and financial resources to convert the new infrastructure.


solution;

1.Open Device Manager (Start / Run or Windows Key + R, enter: devmgmt.msc)
2.Right-click on Adapter 6TO4
3.Choose "Uninstall"
4.Then in the top menu, select "Action" / "add hardware, then" next "
5.Select "manually select from a list" /"network adapter (or network cards)" /"Microsoft"/"Microsoft 6TO4 Adapter"
6.Finally, select "finish installing new hardware"
7.Restart the PC


bacteria comment: even when u try using windows update it will not work. so u got to do it manually. :D

Rabu, 3 Februari 2010

Shutdown network computer using command prompt

here the tips and tricks;

to make it work, u must have gain administrative access. press windows key + R button and then type computer name follow by string C$. eg:

\\computer-name\C$


if windows prompt user name and password and ur already know, it will be simple job (if ur admin).


file will open,


now next step is open the command prompt and type;

shutdown -s -m \\computer-name -t 45 -c "gotcha!!"


your network PC will be shutdown within 45 seconds. and done!

to know more about this please go to link below;

http://samanathon.com

bacteria comment: i always use this to prank friends. :D

Selasa, 26 Januari 2010

How to change font and spacing as a default in office 2007

Follow below steps;

1. Open new document.

2. In font group, change your Font and size. Then click small icon on right below corner.


3. Click Default.


4. Click Yes when you receive the following message:

Do you want to change the default font to font name?
This change will affect all new documents based on the NORMAL template.

5. Click OK.

6. Go to Page Layout tab, and change spacing in paragraph group. Then click small icon on right below corner.


7. Click default and yes to save.


and done!


Bacteria comment: no need to change setting everytime u open new docs.

Selasa, 8 Disember 2009

Disable services to optimize your windows XP

If you feel that your machine so lazy, u now can reduce their working jobs. follow below step and it might get your machine faster 15-35%

1. Go to start, run and type services.msc

2. You can see like picture below,


3. Now all you need to do is to disable un-needed services.

4. Change Startup Type for Alerter service by double-clicking Alerter, selecting Disabled from Startup type dropdown box, and clicking OK button.


5. Now disable the following services using the same technique:

a. Automatic Updates
b. Background Intelligent Transfer Service
c. ClipBook
d. Computer Browser (if you have a standalone pc – no network)
e. Error Reporting Service
f. Fast User Switching Compatibility
g. Help and Support (switch to Manual)
h. Indexing Service
i. Messenger
j. NetMeeting Remote Desktop Sharing
k. Performance Logs and Alerts
l. QoS RSVP
m. Remote Desktop Help Session Manager
n. Remote Registry
o. Server (if you have a standalone pc – no network)
p. Telnet
q. Themes
r. Upload Manager
s. WebClient
t. Wireless Zero Configuration (don’t disable if using wireless network/Internet connection)

6. Close Computer Management window.

7. Restart computer.

Other source to optimize your machine, click here.

Bacteria comment: good for your almost dead ps's.. :D

google translator

for you guys who want to learn other language or to improve skills, google present you its web translator, and guess what? there have a sound too.. cool!


go to this site:
http://translate.google.com/#

bacteria comment: full of fun! reduce time. your quality work increase. :D

Jumaat, 4 Disember 2009

SPINRITE - hard disk recovery and maintenance software utility

SpinRite now brings its legendary data recovery and drive maintenance magic to the latest file systems, operating systems, and hard drives. It runs MUCH faster than ever before, can help maintain all of your drives in tip top shape, can warn of impending disaster, and wrestle data from dying and nearly dead drives.


download link below and follow this steps:

first, u need a floppy drive (to boot spinrite in DOS later).

2. click spinrite program and insert floppy disk.

3. click create boot diskette button.

3. spinrite will tell you to format floppy disk. click ok.

4. when finish restart your machine without take out the floppy disk and press del/esc/F2/F12 button and go to BIOS setting.

5. select boot order and pick diskette as priority. save and exit. machine will now restart.

6 wait until spinrite loading and you can start maintenance your disk.


click Spinrite to download.

bacteria comment: good to repair your almost DEAD hard disk.

Create multiple profile in MS Office Outlook 2007 & 2003

Follow these steps to create a new e-mail profile in Outlook 2007 and in Outlook 2003:

1.Click Start, and then click Run.

2.Copy and paste (or type) the following command in the Open box and then press ENTER: control panel

3.If you are in Classic View, double-click Mail. The Mail Setup dialog box opens. Go to step 5.

4.If you are in Category View, under Control Panel, click Switch to Classic View, and then double-click Mail. The Mail Setup dialog box opens.

5.In the Mail Setup dialog box, click Show Profiles.

6.On the General tab, under When starting Microsoft Office Outlook, use this profile, click Prompt for a profile to be used, and then click Add.

7.In the Profile Name box, type the name that you want to use for the new e-mail profile, and then click OK.

8.In the E-mail Accounts dialog box, click Add a new e-mail account, and then click Next.

9.Click the appropriate server type for your new e-mail account, and then click Next.

10.Type your account information in the required boxes, and then click Next.
Click Finish, and then click OK.

bacteria comment: usually user need more then one outlook profile such as PA or secretary.

Selasa, 29 September 2009

login windows xp without prompt username and password

To set Windows XP to auto logon, follow procedure below. Note that once the computer is configured for automatic login, anyone who can physically gain access to the computer can also gain access to everything that is on the computer, including any network or networks that the computer is connected to. Besides, the password to login is stored in plain text format in the registry, which readable by anyone who can access the console, or remotely by Authenticated Users group. So, auto login feature is convenient, but not entirely secure.

1.Click Start, and then click Run.
2.In the “Open” box, type control userpasswords2, and then click OK.


3.Clear the check box for Users must enter a user name and password to use this computer, and then click Apply.


4. An “Automatically Log On” window will appear. In the dialog box, type the password for Administrator in the Password box, and then retype the password in the Confirm Password box.


Normally, the User Name field will auto fill with “Administrator”, the default super user account in Windows XP that does not come with any password (and normally use as a backdoor hack access to XP system). If you wish, you can change the user name to another user account.

5.Click OK to close the “Automatically Log On” window, and then click OK to close the “User Accounts” window.

bacteria comment: you can try this method on windows vista.

Selasa, 25 Ogos 2009

"Outlook blocked access to the following potentially unsafe attachments" message in Outlook

If you have a problem like this, see below steps.


Follow these steps to modify the registry and change Outlook's attachment security behavior.

1.Exit Outlook if it is running.

2.Click Start, and then click Run. Copy and paste (or type) the following command in the Open box, and then press ENTER:
regedit

3.Verify that the following registry key for your version of Outlook exists.

Microsoft Office Outlook 2007
HKEY_CURRENT_USER\Software\Microsoft\Office\12.0\Outlook\Security
Microsoft Office Outlook 2003
HKEY_CURRENT_USER\Software\Microsoft\Office\11.0\Outlook\Security
Microsoft Outlook 2002
HKEY_CURRENT_USER\Software\Microsoft\Office\10.0\Outlook\Security
Microsoft Outlook 2000
HKEY_CURRENT_USER\Software\Microsoft\Office\9.0\Outlook\Security

If the registry key exists, go to step 5.

If the registry key does not exist, follow these steps to create it:

A.Locate, and then click the following registry key:
HKEY_CURRENT_USER\Software\Microsoft

B.Under Edit, click New, and then click Key.

C.Type Office, and then press ENTER.

D.Under Edit, click New, and then click Key.

For Outlook 2007, type 12.0, and then press ENTER.
For Outlook 2003, type 11.0, and then press ENTER.
For Outlook 2002, type 10.0, and then press ENTER.
For Outlook 2000, type 9.0, and then press ENTER.

E.Under Edit, click New, and then click Key.

F.Type Outlook, and then press ENTER.

G.Under Edit, click New, and then click Key.

H.Type Security, and then press ENTER.

4.Under Edit, click New, and then click String Value.

5.Copy and paste (or type) the following name for the new value:
Level1Remove

6.Press ENTER.

7.Right-click the new string value name, and then click Modify.

8.Type the file name extension of the file type that you want to open in Outlook. For example:
.exe

To specify multiple file types, use the following format:
.exe;.com

9.Click OK.

10.Exit Registry Editor.

11.Restart your computer.

When you start Outlook, you can open the file types that you specified in the registry.


source: http://support.microsoft.com/kb/829982

bacteria comment: You can insert any extension as long its not a virus.. :D

Isnin, 24 Ogos 2009

Enable Administrator profile in Windows 7

1. go to win logo, all programs, accessories
2. right click on command prompt and tick run as administrator


3. open command prompt and write on net user administrator /active:yes and enter


4. restart your machine and log in administrator profile.
5. done.

bacteria comment: easy!

Slow connection for remote desktop and client application-server connectivity

If you face any of the problem of above with Win7 or Vista
Have this command running with administrator privileges

Netsh interface tcp set global rss=disabled autotuninglevel=disabled

bacteria comment: so fast you can see windows flying.. :D

Rabu, 27 Mei 2009

How to remove Win XP SP3 manually

there are 3 method u can use. usually you can just remove it from control panel. but if there is no uninstall button, u can easily use other method (in this case use method 2)

Method 1:
Use the "Add or Remove Programs" item in Control Panel
Click Start, and then click Run.
Copy and then paste the following command in the Open box, and then press ENTER:
appwiz.cpl
Click to select the Show Updates check box.
Click Windows XP Service Pack 3, and then click Remove.
Click Finish to restart the computer after the removal process is complete.

Method 2:

Use the hidden $NtServicePackUninstall$ folder
Click Start, click Run, type c:\windows\$NtServicePackUninstall$\spuninst\spuninst.exe in the Open box, and then click OK.
When the Windows XP Service Pack 3 Removal Wizard starts, click Next.
Follow the instructions on the screen to remove Windows XP SP3.

Method 3:
Use the System Restore process
Note Before you use System Restore, make sure that you have restarted the computer at least one time after you installed Windows XP SP3. By restarting the computer, you allow for any remaining servicing processes to finish.
Click Start, and then click Run.
Copy and then paste the following command in the Open box, and then press ENTER:
%systemroot%\System32\restore\rstrui.exe
Click Restore my computer to an earlier time, and then click Next.
Click the date on which you installed Windows XP SP3, and then click Installed Window XP Service Pack 3 in the Restore Point box.
Click Next, and then follow the instructions on the screen to remove Windows XP SP3.

source: http://support.microsoft.com

bacteria comment: there is always other method to use..

Rabu, 6 Mei 2009

Services.msc & Dfrg.msc access denied

cant help yourself to open MSC files?

Services.msc fail to open


Defragmenter cannot start up


it is probably your registry file corrupted or some how by smart viruses that change the registry value.

You can now fix it by download zip file from this link

please select MSC fix and run the script. Restart your machine and all back to normal.

Bacteria comment: its 100% safe. no malware or spyware, i guarantee!

Selasa, 17 Mac 2009

How to remove WGA

did you update your windows and found popup message like picture below?


or this?


just download the WGA killer and all your migraine gone..

click here to download RemoveWGA 1.2

Bacteria comment: remember to restart your machine when the patch is apply

Selasa, 10 Februari 2009

memaparkan search icon yang hilang di start menu

mencari search icon tetapi tidak jumpa? jangan risau dan kusut masai. ikuti langkah dibawah ini. hanya copy dan paste, nescaya hilang keraguan anda.


1. pergi start
2. run

sila copy paste registry dibawah ini kedalam kotak run:

REG add HKCU\Software\Microsoft\Windows\CurrentVersion\Policies\Explorer /v NoFind /t REG_DWORD /d 0 /f


3. klik ok

nah, mudah bukan. selamat mencuba!

komen bacteria: akhirnya dapat jugak registy coding ini setelah sekian lama mencari jawapan.

Khamis, 5 Februari 2009

check ur current IP

please visit this site:

www.iptools.com

it will reveal ur current IP using. Plus, other features u can use.

bacteria comment: gewd for remote using especially when ur using DHCP mode..

Rabu, 4 Februari 2009

Internet Explorer has encountered a problem and needs to close

pernah kah anda setiap kali membuka internet explorer dan secara tiba-tiba keluar popup windows seperti "Internet Explorer has encountered a problem and needs to close. We are sorry for the inconvenience." keluar??


atau juga seperti dibawah ini?


jika ya, mungkin terdapat add-on didalam IE anda tidak berfungsi/korup/not support pada website-website tertentu.

untuk mengembalikan IE seperti keadaan baik, anda boleh mengikuti langkah-langkah berikut:

1. buka IE, klik pada button tools, pilih Manage Add-on dan tekan Enable or disable Add-on


2. seterusnya disablekan Add-on pada kolum settings. Pastikan anda disable/enablekan Add-on yang anda rasakan tidak/perlu atau kelihatan pelik (mungkin spyware).


Komen bacteria: jika anda tidak pasti yang mana satu perlu disablekan Add-on, cuba disablekan semua dan lihat IE anda. Apa yang perlu di enablekan adalah Adobe shockwave flash add-on bagi membenarkan flash bergerak didalam IE

Isnin, 19 Januari 2009

How to move outlook .ost file to other drive

in certain reason, some user want to save their outlook .ost (offline) to other folder or drive. in default setting, these file is store in C:\Documents and Settings\user\Local Settings\Application Data\Microsoft\Outlook\outlook.ost and its quit long path and hidden too.

for some software like Deep Freeze (will elibrate later), these file need to transfer in other partition (thawed drive) to make changes. if not it will be feeze out.

the step is like below:

1. First you need to close your Outlook.

2. Click Start, and then click Control Panel.

3. Double-click Mail, and then click E-mail Accounts.

4. Click View or change existing e-mail accounts, and then click Next.

5. Select the Microsoft Exchange Server account, and then click Change.

6. Clear the Use Cached Exchange Mode check box.

7. Click More Settings.

8. Click the Advanced tab.

9. Click Offline Folder File Settings.

10. Click Disable Offline Use, and then click Yes in the dialog box that appears.

11. Click Offline Folder File Settings.

12. Click Browse, go to the location where you want to save your .ost file, and then click Open.

13. Click OK.

14. Select the Use Cached Exchange Mode check box.

15. Click Next, and then click Finish.


bacteria comment: im trying deep freeze now, and seem it work for transferring data to thawed drive..

Jumaat, 2 Januari 2009

disable USB

jika anda tidak mahu data anda dicopy oleh penceroboh ke dalam pendrive, bacteria cadangkan anda menggunakan software ini. Disable USB free boleh menyelamatkan anda.

sila download disini

setelah download, dwi klik pada aplikasi


dan klik diable USB pada radio button yang disediakan


untuk mengaktifkan semula USB anda, cara yang sama dilakukan dan kemudian pilih butang enable.

komen Bacteria: tutup mata pun boleh buat.. :D

Ninja pendisk

seringkali pendrive anda diserangi oleh virus? memang mudah untuk membuang virus. tetapi bagaimana menangani masalah virus yang tidak kelihatan? seperti contoh autorun.inf?

anda boleh membuangnya secara manual seperti posting yang bacteria terangkan sebelum ini. cuma ia memakan masa sedikit.

tetapi kini dengan adanya software Ninja pendisk, anda tidak perlu bersusah payah. hanya instal, dan biarkan Ninja kecil kita ini melakukan kerjaya.


langkah-langkah mudah:

1. setelah install, apa yang anda perlu adalah mengaktifkan aplikasi ninja secara automatik setiap kali startup dilakukan.

2. right click pada icon Ninja Pendisk didalam tray icon


3. klik add to startup

kini, setiap kali anda memasukkan pendrive pada pc, auto checkup akan dilakukan dan anda tidak perlu risau.


untuk mengdownload, sila klik disini

komen bacteria: senang dan mudah!